Установка HardLink Extension
Установка SugarSync
Отключение виртуального диска
I don’t know what is wrong with developers today, but it is a growing trend to make things “just work” at the expense of leaving any sort of options for the user to self-configure. Extra or advanced options seem to be a taboo with new applications, which is a real shame.
SugarSync v2 beta is one of these applications. Even the installer asks no questions, not letting me choose an installation folder, or where to put the SugarSync folder to begin with.
Well, one thing it installs is a virtual disk driver that enables a new SugarSync virtual drive, in my case G:. To disable this, open device manager as an administrator and disable the virtual disk driver.
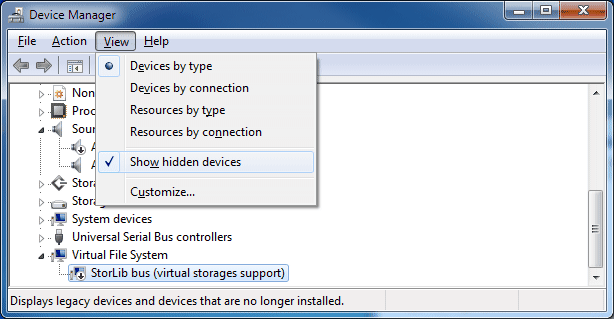
You will need to show hidden devices to see it. Right click the device and disable.
Взято отсюдаА может вообще от него отказаться?
SugarSync v2 beta is one of these applications. Even the installer asks no questions, not letting me choose an installation folder, or where to put the SugarSync folder to begin with.
Well, one thing it installs is a virtual disk driver that enables a new SugarSync virtual drive, in my case G:. To disable this, open device manager as an administrator and disable the virtual disk driver.
You will need to show hidden devices to see it. Right click the device and disable.
Взято отсюдаА может вообще от него отказаться?
Установка CrashPlan
Процедура отождествления данных
Crashplan has a feature—called "Adopting another computer"—that lets you do just this. Using the external hard drive as ane example, here's how it works:
- Install CrashPlan on your new computer, then log into your account.

- Once you're logged in, you should see a New Computer message at the top of the CrashPlan window. Click the Adopt link.

- Now choose the computer you want to adopt. This should be the computer your drive and data were previously backed up with.
- The Files section of the Backup tab will now display the same sources as the computer you adopted, including your storage drive. Make sure everything looks right (e.g., the source exists in the same path on your new computer as it did on your old one) and you're ready to back up, no painful initial upload required.
That's all there is to it. It's relatively simple, and you might want to check out CrashPlan's documentation for more details, but the simple feature saved me a couple weeks of uploading. I do love my CrashPlan.
Взято отсюдаСтатья в поддержке
Установка VirtualBox
Отключение синхронизации времени (компиляция)Google search
VirtualBox: Disable time sync between host and client
Virtualbox (or its Guest Additions) have this annoying habit of automatically keeping the clock in sync with the host, regardless of the settings that one tries to implement within the guest itself. For example, in a Windows 7 guest that I’m trying to use for consistent screenshots I need to set the clock to specific dates. However, as soon as I set it, Virtualbox changes it back.
Here’s how to change it:
vboxmanage setextradata “
Изменения в конфиг файле
"C:\Documents and Settings\ishutov\VirtualBox VMs\BI Tableau\BI Tableau.vbox":
=======================
How To Disable Host Time Synchronization in Virtual Box*
Working on daylight savings time bugs is the perfect opportunity to utilize virtualization. I don't want to inadvertently mess up my laptop by changing the date and time over and over again while I'm debugging, so I setup a new VM that I can fiddle with safely. Unfortunately, I ran into an issue where VirtualBox was automatically synchronizing the VM clock with my host machine's date and time every 10 seconds (as it is configured to by default). Searching online, I found a way to disable this feature while I work on DST issues and I am documenting the trick for posterity:
Disable Time Sync
vboxmanage setextradata [VMName] "VBoxInternal/Devices/VMMDev/0/Config/GetHostTimeDisabled" "1"
Enable Time Sync
vboxmanage setextradata [VMName] "VBoxInternal/Devices/VMMDev/0/Config/GetHostTimeDisabled" "0"
This puts an entry in the XML file for the VM specified (note that it's called "[VM Name].vbox" in the folder where VMs are kept) in the 'ExtraData' node, so one could also just delete this entry to restore the default behavior.
NOTE I was unable to get this to work while the VM was running. I think it's required that the VM is off when changing this setting, even though the command didn't return failure.
=======================
Wayne says:
March 17, 2010 at 6:01 pm
Can someone tell me how to turn on the time sync feature… I turned it off successfully with this command
vboxmanage setextradata “VBoxInternal/Devices/VMMDev/0/Config/GetHostTimeDisabled” “1
… now I’d like to turn it back on.
Thanks
Reply
ricog says:
March 17, 2010 at 10:39 pm
Wayne, I haven’t confirmed, but I think if you set the 1 to a 0 (zero) on that command it will disable it.
Reply
Ulison Jean says:
March 18, 2010 at 5:52 am
Well I found one solution to do this.
Go to
C:\Documents and Settings\\.VirtualBox\Machines\
and edit the xml file.
–>Create a backup of this file<–
Delete this line:
Note: the script vboxmanage setextradata “VBoxInternal/Devices/VMMDev/0/Config/GetHostTimeDisabled” “1 will create one line in this xml, so if you run more then once time you’ll see more lines. Delete these also.
Установка BittorrentSync
Установка Copy
Лог файл по синхронизации в кодировке UTF можно найти здесь:C:\Users\%USERNAME%\AppData\Roaming\Copy\synclog.txt