Показаны сообщения с ярлыком Productivity Tools. Показать все сообщения

среда, 4 октября 2017 г.

Создание загрузочного USB диска

Создание в т.ч. и из образов .ISO

понедельник, 6 марта 2017 г.

Полезные онлайн-ресурсы для получения\трансформации данных


понедельник, 28 ноября 2016 г.

Список полезных инструментов (для Windows)

По состоянию на 29.09.2017


По состоянию на 28.11.2016


По состоянию на 07.07.2016


По состоянию на 16.06.2016


По состоянию на 11.01.2016

============================================================


понедельник, 10 октября 2016 г.

Каталогизация фото и аудио

Фото

Найденные и проверенные утилиты для переименования в соотв. с данными из EXIF:

Почему-то, после SP1 для win10 EXIF ReName сломался. Для моделирования правил переименования в Bulk Rename аналогичным EXIF ReName образом, там необходимо провести такую настройку:
 - Custom AutoDate: %Y-%m-%d %H.%M.%S

Дополнительные настройки

Для работы с фотографиями необходимо
  1. Выбрать режим работы с EXIF информацией в меню Renaming Options\ID3/EXIF Data...
  2. Выбрать файлы в списке и увидеть что новое имя файла преобразуется.

Аудио

Similarity - Поиск похожих файлов


понедельник, 12 сентября 2016 г.

Настройка EmEditor

Настройка проверки орфографии

Взято отсюда.
EmEditor uses the Hunspell library, also used by applications such as OpenOffice and Firefox, to check spelling in multiple languages. With Camel Case support, EmEditor also lets you check for misspellings in variable/function names.
As you type, misspelled words are marked with red wiggly underlines. EmEditor allows you to correct misspelled words quickly and easily. The EmEditor installer includes a U.S. English dictionary by default. Additional dictionaries are available for download at the OpenOffice.org. After download a dictionary, change the file extension from .oxt to .zip, extract the Zip file, and then copy *.dic and *.aff files into the Dictionaries sub folder of the EmEditor install folder (usually C:\Program Files\EmEditor\Dictionaries).
Как настраивать проверку орфографии написано в помощи:
EmEditor Home - EmEditor Help - Command Reference - Edit categoryCheck Spelling command 

четверг, 5 ноября 2015 г.

Полезные плагины для браузеров

Chrome

  • User-Agent Switcher
  • Evernote


Firefox

  • Pocket
  • Video DownloadHelper
  • Video Myxa
  • Flash and Video Download


вторник, 29 сентября 2015 г.

Еще полезный инструментарий (windows)


  • "Everything" is search engine that locates files and folders by filename instantly for Windows.
  • Lookeen is an indexed-based file and email search tool for business and private users. With Lookeen you will not only find the information you need on your desktop – shared folders and network paths can also be indexed and searched.

понедельник, 18 мая 2015 г.

Инициализация нового компа

Установка HardLink Extension


Установка SugarSync

Отключение виртуального диска

I don’t know what is wrong with developers today, but it is a growing trend to make things “just work” at the expense of leaving any sort of options for the user to self-configure. Extra or advanced options seem to be a taboo with new applications, which is a real shame.
SugarSync v2 beta is one of these applications. Even the installer asks no questions, not letting me choose an installation folder, or where to put the SugarSync folder to begin with.
Well, one thing it installs is a virtual disk driver that enables a new SugarSync virtual drive, in my case G:. To disable this, open device manager as an administrator and disable the virtual disk driver.
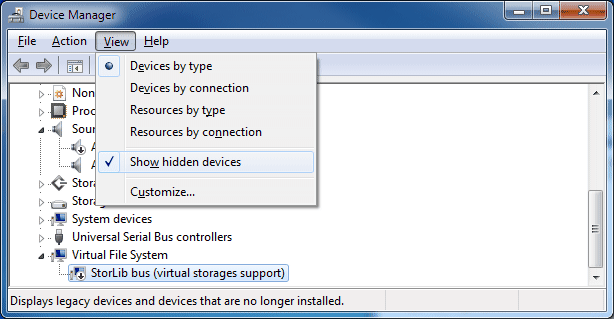
devmgmt-disable-sugarsync-drive
You will need to show hidden devices to see it. Right click the device and disable.
Взято отсюдаА может вообще от него отказаться?

Установка CrashPlan

Процедура отождествления данных

Crashplan has a feature—called "Adopting another computer"—that lets you do just this. Using the external hard drive as ane example, here's how it works:
  1. Install CrashPlan on your new computer, then log into your account.
    How to Move Your CrashPlan Backups to a New Computer
  2. Once you're logged in, you should see a New Computer message at the top of the CrashPlan window. Click the Adopt link.
    How to Move Your CrashPlan Backups to a New Computer
  3. Now choose the computer you want to adopt. This should be the computer your drive and data were previously backed up with.
  4. The Files section of the Backup tab will now display the same sources as the computer you adopted, including your storage drive. Make sure everything looks right (e.g., the source exists in the same path on your new computer as it did on your old one) and you're ready to back up, no painful initial upload required.
That's all there is to it. It's relatively simple, and you might want to check out CrashPlan's documentation for more details, but the simple feature saved me a couple weeks of uploading. I do love my CrashPlan.
Взято отсюда
Статья в поддержке

Установка VirtualBox

Отключение синхронизации времени (компиляция)

Google search
VirtualBox: Disable time sync between host and client


Virtualbox (or its Guest Additions) have this annoying habit of automatically keeping the clock in sync with the host, regardless of the settings that one tries to implement within the guest itself.  For example, in a Windows 7 guest that I’m trying to use for consistent screenshots I need to set the clock to specific dates.  However, as soon as I set it, Virtualbox changes it back.

Here’s how to change it:

vboxmanage setextradata “” “VBoxInternal/Devices/VMMDev/0/Config/GetHostTimeDisabled” “1

Изменения в конфиг файле
"C:\Documents and Settings\ishutov\VirtualBox VMs\BI Tableau\BI Tableau.vbox":


=======================
How To Disable Host Time Synchronization in Virtual Box*
Working on daylight savings time bugs is the perfect opportunity to utilize virtualization. I don't want to inadvertently mess up my laptop by changing the date and time over and over again while I'm debugging, so I setup a new VM that I can fiddle with safely. Unfortunately, I ran into an issue where VirtualBox was automatically synchronizing the VM clock with my host machine's date and time every 10 seconds (as it is configured to by default). Searching online, I found a way to disable this feature while I work on DST issues and I am documenting the trick for posterity:

Disable Time Sync
vboxmanage setextradata [VMName] "VBoxInternal/Devices/VMMDev/0/Config/GetHostTimeDisabled" "1"
Enable Time Sync
vboxmanage setextradata [VMName] "VBoxInternal/Devices/VMMDev/0/Config/GetHostTimeDisabled" "0"
This puts an entry in the XML file for the VM specified (note that it's called "[VM Name].vbox" in the folder where VMs are kept) in the 'ExtraData' node, so one could also just delete this entry to restore the default behavior.

NOTE I was unable to get this to work while the VM was running. I think it's required that the VM is off when changing this setting, even though the command didn't return failure.


=======================
Wayne says:
March 17, 2010 at 6:01 pm
Can someone tell me how to turn on the time sync feature… I turned it off successfully with this command

vboxmanage setextradata “VBoxInternal/Devices/VMMDev/0/Config/GetHostTimeDisabled” “1

… now I’d like to turn it back on.

Thanks

Reply
ricog says:
March 17, 2010 at 10:39 pm
Wayne, I haven’t confirmed, but I think if you set the 1 to a 0 (zero) on that command it will disable it.

Reply
Ulison Jean says:
March 18, 2010 at 5:52 am
Well I found one solution to do this.
Go to
C:\Documents and Settings\\.VirtualBox\Machines\
and edit the xml file.
–>Create a backup of this file<–
Delete this line:

Note: the script vboxmanage setextradata “VBoxInternal/Devices/VMMDev/0/Config/GetHostTimeDisabled” “1 will create one line in this xml, so if you run more then once time you’ll see more lines. Delete these also.

Установка BittorrentSync


Установка Copy

Лог файл по синхронизации в кодировке UTF можно найти здесь:
C:\Users\%USERNAME%\AppData\Roaming\Copy\synclog.txt

понедельник, 15 декабря 2014 г.

Работа с Video


  • MediaInfo is a convenient unified display of the most relevant technical and tag data for video and audio files.
  • VidCoder is a DVD/Blu-ray ripping and video transcoding application for Windows. It uses HandBrake as its encoding engine.
  • HandBrake is a tool for converting video from nearly any format to a selection of modern, widely supported codecs. Reasons you’ll love HandBrake:
    • Convert video from nearly any format
    • Free and Open Source
    • Multi-Platform (Windows, Mac and Linux

среда, 26 ноября 2014 г.

Manually unistall K9 Web Protection


If you have forgotten your K9 password, you can remove it manually - 

go to C:\Program Files\Blue Coat K9 Web Protectionclick once on license
then press delete button
go to http://www.k9webprotection.com/download/k9-webprotection.exe
then press run
press next
click i agree
click next
go to http://www1.k9webprotection.com/getk9/index.php
fill the form in
then check your email if you've got the license 
then copy and paste the license into the installation
click next
then create your own password
then click next
click install
then it has the part where it says error opening file for writing.....
you click ignore
then go to manually reboot later
go to start
go to all programs
go to where it says blue coat k9 web protection
go to uninstall
click yes
then type the password that you made before
then reboot now
and voila...you uninstalled it

-----------------------------------------------------------------------------

To disable K9 Web Protection, follow these steps:

1. Go to the website and download the K9 Web Protection Installer for your system (64bit, or 32bit)

2. Let it download, and instead of clicking "Run" Click "Save" and save it to a location of your choosing.

3. Right click your "My Computer" icon, then click "Properties". When that window opens up click on the"Hardware" tab, then click "Device Manager" when the next window opens.

4. Click the "View" tab at the top of the Device Manager, then click "Show Hidden Devices".

5. Then look for "Non-Plug and Play Drivers" and open up that tree. Then find the device called, "bckd". Right click it, and then click "Disable"
6. A message will pop up telling you to reboot your PC, do so.

7. After it boots up, there should be a message down in the right corner saying "K9 Web Protection has become Corrupted" or something similar. This is good :).

8. Before you can surf the internet, go to wherever you saved the K9 Installer from steps 1 and 2, and run the installer.

9. It should just pop up with a message asking you to update K9 web protection, click "Yes" and for the next message that pops up, click "Ok"

10. Wait a little bit, and then you can got to any Website.

11. To re-enable K9 Web Protection, just go back to the device manager and re-enable "bckd".

-----------------------------------------------------------------

Open Device Manager
Click View
Click Show Hidden devices
Under Non Plug and play drivers disable the following
bckd
mpfirewl

пятница, 21 ноября 2014 г.

Проблемы с Java


    go to control panel, programs, click on java, security. 
    set security to medium that worked for me
"C:\Program Files (x86)\Java\jre7\bin\javacpl.exe" 

  •  

пятница, 19 сентября 2014 г.

Самостоятельное просыпание Windows


  • Краткая информация по матчасти.
  • Смотрим журнал событий


  • Смотрим настройки энергопитания

  • Вот они и есть 6 часов. Меняем на ОЧЕНЬ МНОГО.
  • понедельник, 1 сентября 2014 г.

    Пакетное преобразование SVG -> PNG

    Было две опции ImageMagick и Inkscape

    ImageMagick
    rem http://www.imagemagick.org/script/command-line-options.php#depth
    FOR %%x IN (*.svg) DO "C:\Program Files\ImageMagick-6.8.7-Q16\convert.exe" ^
            -density 144 -background none -colorspace RGB -depth 16 %%~nx.svg %%~nx.png

    Inkscape
    FOR %%x IN (*.svg) DO "C:\Program Files (x86)\Inkscape\inkscape.exe" ^
        --export-png=%%~nx.png --export-dpi=200 ^
        --export-background-opacity=0 --without-gui %%~nx.svg

    Inkscape сделал один в один к оригиналу.
    ImageMagick рисовал фреймы вокруг внутренних объектов.

    среда, 11 декабря 2013 г.

    вторник, 15 октября 2013 г.

    Конвертирование изображений

    Everpix + python + ImageMagik


    Wand -- Python Binding for ImageMagik
    http://stackoverflow.com/questions/7895278/can-i-access-imagemagick-api-with-python

    и немного на русском
    http://blog.xxblx-duke.com/?e=62

    Оперируем с ImageMagick из командной строки

    To preserve aspect ratio:
    convert -resize 600x600 screen.jpg:
    • 1920x1200 => 600x375
    • 600x1200 => 300x600
    • 150x300 => 300x600
    • 300x150 => 600x300
    convert -resize 600x600\> screen.jpg:
    • 1920x1200 => 600x375
    • 600x1200 => 300x600
    • 150x300 => 150x300 (is not resized to bigger size)
    • 300x150 => 300x150 (is not resized to bigger size)

    Everpix

    Troubleshooting missing photos in Everpix
    What kind of photos get imported to Everpix?
    Everpix currently only imports photos that match these criteria:

    • In JPEG format i.e. no TIFFs or RAWs
    • Using RGB color model i.e. not grayscale or CMYK
    • At least 480 pixels on the smallest dimension but less than 15,000 pixels on the largest dimension
    • With an aspect ratio less than 10


    Troubleshooting missing photos in Everpix

    среда, 10 октября 2012 г.

    Менеджеры презентаций

    Задача управления большим количеством презентаций с дублирующимися слайдами достаточно часто возникает у людей, проводящих официальные переговоры с заказчиками. Поэтому был найден и апробирован ряд программ для управления всем этим трешем, включая:
    • хранение preview слайдов;
    • локальная индексация презентаций;
    • поиск похожих слайдов;
    • поиск текста;
    • компоновка новых презентаций методом "drag-and-drop".
    ==================
    Updated 10/2012


    ==================
    Основные игроки
    (независимый анализ интернета показал, что я не одинок в изысканиях)

    Вопрос с аспирином, увы, открыт.

    вторник, 2 октября 2012 г.